Understanding and use python virtualenvs from Data Scientist perspective
A Virtual Environment is a real good way to keep the dependencies
required by different projects in separate places, by creating virtual
Python environments for each of them. It solves the “Project X depends
on version 1.x but, Project Y needs 4.x” dilemma, and keeps your global
site-packages directory clean and manageable. For example, you can work
on a project which requires matplotlib 1.5.3 while also maintaining a
project which requires matplotlib 1.4.2.
There are different tools that can manage python virtual environment, those I will show are:
- virtualenv
- anaconda (by continuum analytics)
The first one is the most popular for general pourpose coding projects, anaconda is much more suitable for who works in data science field. In this post I would like to explain out how to install and use both of them to create your python virtualenv.
Virtualenv
When you run virtualenv command inside your shell, it
creates a folder which contains all the necessary executables to use the
packages that a Python project would need.
To install virtualenv via pip:
pip install virtualenv
To install python pip via s.o. package manager (ubuntu for instance):
sudo apt-get install python-pip
Basic usage
Create a firt virtual environment for your project:
cd my_venv_dir
virtualenv myproject
virtualenv myproject will create a folder in the directory you are
which will contain the Python executable files, and a copy of the pip
library which you can use to install other packages. Usually I do not
create the virtual environment within the source code directory in order
to keep venv and code separate. In this way I don't need to exclude the
virtualenv directory from the version control system I will use for
software versioning.
In your virtualenvironment directory you shuold have something like this:
$ ls -la

drwxr-xr-x  16 user  staff  544 May 15 06:33 bin
drwxr-xr-x   3 user  staff  102 May 15 06:30 include
drwxr-xr-x   4 user  staff  136 May 15 06:33 lib
-rw-r--r--   1 user  staff   60 May 15 06:33 pip-selfcheck.json
You can also use the Python interpreter of your choice (like python2.7).
virtualenv -p /usr/local/bin/python2 myproject
Naturally you need change the python 2 path with yours.
To begin using the virtual environment, it needs to be activated:
source /myproject/bin/activate
The name of the current virtual environment will now appear as prefix of
the prompt (e.g. $(myproject)username@yourcomputer) to let you know
that it’s active. From now on, any package that you install using pip
will be placed in the myproject folder, in this way the global Python
installation will remain clean.
Install packages as usual:
pip install matplotlib
If you want to deactivate your virtualenv with:
deactivate
This puts you back to the system’s default Python interpreter with all its installed libraries.
To delete a virtual environment, just delete the folder. (In this case,
it would be rm -rf myproject.)
After a while, though, you might end up with a lot of virtual environments littered across your system, and its possible you’ll forget their names or where they were placed.
Extra commands
In order to keep your environment consistent, it’s a good idea to “freeze” the current state of the environment packages. To do this, run
pip freeze > requirements.txt
This will create a requirements.txt file, which contains a list of all
the packages in the current environment, and their respective versions.
You can see the list of installed packages without the requirements
format using pip list. Later it will be easier for a different
developer (or you, if you need to re-create the environment) to install
the same packages using the same versions:
pip install -r requirements.txt
Remember to add the requirements file in your current project directory; this can help ensure consistency across installations, across deployments, and across developers.
Now let's take a look to the packages you need for starting a new
virtual environment for data analytics projects. The most used by me
are: numpy, pandas, matplotlib, jupyter notebook, scipy;
naturaly each of you can use those who prefer.
As you can see in the previous paragraphs to install a python lib in a
virtualenv you may use pip command; to install each package there are
2 simple ways: install them one by one or create a requirements.txt file
with one library per line:
numpy
pandas
matplotlib
jupyter
scipy
or if you want you can specify the version if you want to avoid the installation of the latest stable release of the softwares:
numpy==1.10
pandas==0.18.1
jupyter
matplotlib==1.5.1
scipy
Now pip install -r requirements.txt will install all your software and
the related dependencies; and your data science oriented virtualenv is
now ready to go.
The Anaconda© python distribution
From my personal point of view, a more appropriate way than using virtualenv is to adopt the Anaconda platform. Anaconda is the leading open data science platform powered by Python. The open source version of Anaconda is a high performance distribution of Python and R and includes over 100 of the most popular Python, R and Scala packages for data science.
Additionally, you'll have access to over 720 packages that can easily be installed with conda, our renowned package, dependency and environment manager, that is included in Anaconda.
If you're interesting on "Why should I use Anaconda?" I may suggest you to read:
- https://www.continuum.io/why-anaconda
- https://www.reddit.com/r/Python/comments/3t23vv/what_advantages_are_there_of_using_anaconda/
The two principal advantages more useful in my own experience are the user level install of the version of python you want and the "batteries included" for data science (e.g. numpy, scipy, PyQt, spyder IDE, etc.)
Install Anaconda is very simple, just download the rigth package for your O.S. and use the instructions on the page to install it in the proper way.
For instance if you use Linux or Mac OSX:
bash Anaconda-v-0.x.y.sh
and follow the instructions on the screen. Note that during the Anaconda installation process it will ask you to add a directive in your bash profile to change your default python path. In this way Anaconda python distribution will be your new python ecosystem, otherwise if you answer no to use the Anaconda python you have to select the python executable by hand.
Now that Anaconda is installed you are able to create a new conda environment or anyway you can use the root env with a lot of packages. Let's see how to create a conda env now:
conda create -n envname

# if you want to pass a specific python version

conda create -n envname python=2.7
Once the env is created you may activate it
source activate envname
This should procude something like this:
(envname) user@hostname$

# check your python version

(envname) user@hostname$ python
Python 3.5.2 |Continuum Analytics, Inc.| (default, Jul  2 2016, 17:52:12)
[GCC 4.2.1 Compatible Apple LLVM 4.2 (clang-425.0.28)] on darwin
Type "help", "copyright", "credits" or "license" for more information.
>>>
Now, as used with the [virtualenv]{.title-ref} tool we can install the packages we need in our conda env with the conda command.
(envname) user@hostname$ conda install pandas # e.g. install pandas package
Managing the environments is quite easy, there are several options to use with conda command; here a good cheatsheet with all the reference you need.
Remember that Anaconda is batteries included so it's possible you have all the packages you need in the root env. Without create or activate any environment try to check the library installed in your conda root instance, you should have something like this
user@hostname$ conda list
...
ruamel_yaml               0.11.14                  py35_0
sasl                      0.2.1                     <pip>
scikit-image              0.12.3              np111py35_1
scikit-learn              0.17.1              np111py35_2
scipy                     0.18.1              np111py35_0
scp                       0.10.2                    <pip>
seaborn                   0.7.1                     <pip>
...
As you can notice some packages in the previous snippet are installed
via pip, this means that with anaconda and within any
conda env you can use also the pip command to get the
python modules you want.
Import and Export a conda environment
To enable other people to create an exact copy of your environment, you can export the active environment file.
Activate the environment you wish to export:
Linux, OS X: source activate envname
windows: activate envname
Now export your env to new declarative file:
conda env export > environment.yml
NOTE: If you already have an environment.yml file in you current directory, it will be overwritten with the new file.
If you instead of exporting your env you want to create a new conda environment from an .yml file:
conda env create -f environment.yml
The enviromnent files can be created by hand just beeing compliant with some basic ruels. For instance if you want to set your dependencies these are the rules to follow:
env_name: stats
dependencies:
   - numpy
   - pandas
   - scipy
and then save your file with the name you want.
Unlike pip, conda is language-agnostic, this
permit you to use the R language in your conda environment, and
obviously create R based notebooks with jupyter.
The Anaconda team has created an “R Essentials” bundle with the IRKernel and over 80 of the most used R packages for data science, including dplyr, shiny, ggplot2, tidyr,caret and nnet.
Downloading “R Essentials” requires conda. Miniconda includes conda, Python, and a few other necessary packages, while Anaconda includes all this and over 200 of the most popularPython packages for science, math, engineering, and data analysis. Users may install all of Anaconda at once, or they may install Miniconda at first and then use conda to install any other packages they need, including any of the packages in Anaconda.
Once you have conda, you may install “R Essentials” into the current environment:
conda install -c r r-essentials
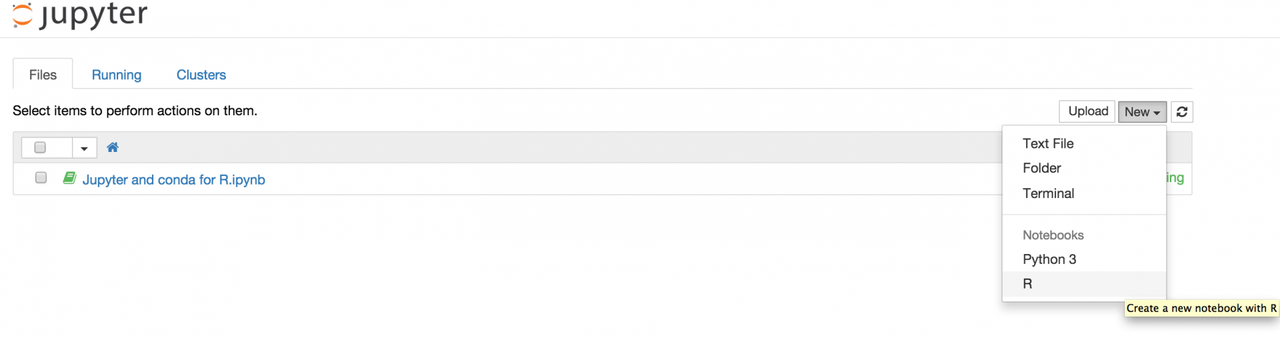
and now starting jupyter notebook from your virtual environment
$ jupyter notebook you are able to create a new R notebook:
References
Part of this post is inspired by: